최근 많은 것들에 대해 모듈화를 진행하는 재미에 빠져 여러가지 CustomView를 만들고 Gradle로 배포하고 있다.
원래 단순히 내가 만드는 것들에 대해 기록하기 위해 블로그를 만들었는데 혹시나 나중에 방법이 기억나지 않거나 모르는 사람이 봤을때 따라할 수 있도록 CustomView 제작방법을 적어볼까한다.
※ 한번의 클릭으로 많은 기능을 하도록 만드는 것이 나의 개인적인 목표이다.
ex) SampleProfileView
- 유저이미지
- 유저닉네임
- 신고버튼 (내 프로필 일 경우 Gone)
- 기타정보 (내부 정보로 Hidden)
1. Layout 생성 : 기본이 될 Panel깔기
우리는 activity나 fragment를 생성하여 하나의 화면을 만들고자 할때 기본적으로 xml파일을 수정하여 화면을 구성한다.(동적으로 코드로도 생성이 가능) CustomView 또한 같은 접근을 한다.
|
1
2
3
4
5
6
7
8
9
10
11
12
13
14
15
16
17
18
19
20
21
22
23
24
25
26
27
28
29
30
31
32
|
<?xml version="1.0" encoding="utf-8"?>
android:orientation="vertical" android:layout_width="match_parent"
android:layout_height="400dp">
<RelativeLayout
android:background="#B6B6B6"
android:orientation="horizontal"
android:layout_width="match_parent"
android:layout_height="wrap_content">
<TextView
android:textSize="20sp"
android:layout_alignParentLeft="true"
android:id="@+id/nickname"
android:text="TEST NICKNAME"
android:layout_width="wrap_content"
android:layout_height="wrap_content" />
<Button
android:text="신고"
android:layout_alignParentRight="true"
android:id="@+id/btn_report"
android:layout_width="wrap_content"
android:layout_height="wrap_content" />
</RelativeLayout>
<ImageView
android:background="#F9F9F9"
android:id="@+id/image"
android:src="@mipmap/ic_launcher_round"
android:layout_width="match_parent"
android:layout_height="match_parent" />
</LinearLayout>
http://colorscripter.com/info#e" target="_blank" style="color:#4f4f4ftext-decoration:none">Colored by Color Scripter
|
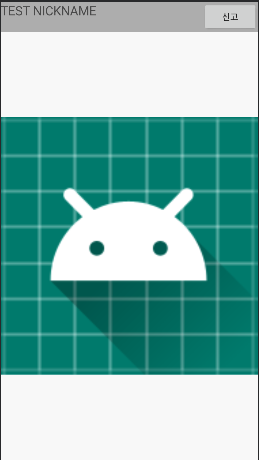
샘플이미지를 구분하기위해 임의의 색과 데이터를 넣었다.
2. CustomView 코딩
내가 기능들을 정의해놓는 코드 우리가 사용하고 있는 TextView 등도 까보면 같은 방식으로 되어있다. 나는 최대한 한번의 컨트롤로 많은걸 해주길 바라기 때문에 다음의 기능들을 만들예정이다.
| setUserData | 유저정보 입력 |
| getUserData | 유저정보 가져오기 |
| setReportListener | 신고버튼 리스너 추가 |
UserData와 Listener는 임의로 만든 데이터타입으로 자세한 것은 Github에 올려두며 따라하고 계신분이 있다면 입맛에 맞게 바꿔도 무방하다.
|
1
2
3
4
5
6
7
8
9
10
11
12
13
14
15
16
17
18
19
20
21
22
23
24
25
26
27
28
29
30
31
32
33
34
35
36
37
38
39
40
41
42
43
44
45
46
47
48
49
50
51
52
53
54
55
56
57
58
59
60
61
|
public class ProfileView extends LinearLayout
{
private ImageView vImage;
private TextView vNickName;
private Button vBtnReport;
private UserData userData;
private ButtonClickListener clickListener;
public ProfileView(Context context)
{
this(context, null);
}
public ProfileView(Context context, AttributeSet attrs)
{
super(context, attrs);
setup();
}
private void setup(){
final LayoutInflater inflater = (LayoutInflater) getContext().getSystemService(Context.LAYOUT_INFLATER_SERVICE);
inflater.inflate(R.layout.item_profile_view, this);
vImage = findViewById(R.id.image);
vNickName = findViewById(R.id.nickname);
vBtnReport = findViewById(R.id.btn_report);
}
//사용자 호출 메소드
public void setUserData(UserData userData){
this.userData = userData;
vImage.setImageURI(convertStringToUri(userData.getImagePath()));
vNickName.setText(userData.getNickName());
}
public void setReportListener(ButtonClickListener listener){
this.clickListener = listener;
vBtnReport.setOnClickListener(new OnClickListener()
{
@Override
public void onClick(View v)
{
clickListener.onClick(v);
}
});
}
private Uri convertStringToUri(String path){
Uri uri = Uri.parse(path);
return uri;
}
public UserData getUserData(){
return this.userData;
}
}
http://colorscripter.com/info#e" target="_blank" style="color:#4f4f4ftext-decoration:none">Colored by Color Scripter
|
점검
이제 만들던 View를 띄울 Layout에 올리고 빌드해보자. 문제가 없다면 xml preview화면에서 만들었던 View가 뜰것이다.
점검이라고는 했지만 사실상 이제부터는 사용하는 단계이기에 다음 글에서 임의로 만든 데이터타입과 Custom Listener 등과 같은 심화(?)내용을 다뤄 보겠다.
풀버전 코드 Github : https://github.com/aqoong/SampleProfileView
aqoong/SampleProfileView
sample project (education). Contribute to aqoong/SampleProfileView development by creating an account on GitHub.
github.com
반응형
'Develop > Android' 카테고리의 다른 글
| Singleton VS Application class (3) | 2019.09.04 |
|---|---|
| Android CustomView 만드는 방법 (Java) #2 (1) | 2019.07.24 |
| AndroidX 마이그레이션 방법 (3) | 2019.07.12 |
| [CustomView] TextView를 이용한 SNS 더보기 기능 (1) | 2019.07.07 |
| 안드로이드 버전과 API레벨 (4) | 2019.07.07 |

